

Cisco Modeling Labs (CML) 2.6, the most recent model of our premier community virtualization platform, is lastly right here. CML 2.6 presents fairly a listing of helpful instruments, with additions like Amazon Internet Providers (AWS) Cloud deployment and a brand new Upkeep mode for system admins.
Nonetheless, I’m right here to focus on the function I’m most enthusiastic about:
CML 2.6 consists of a revamped Workbench that permits customers to see a number of gadgets, instruments, and configs in the identical view.
New options inside revamped Workbench embrace:
-
- a menu so as to add nodes to your office.
- a sidebar hub to modify lab parts.
- multi-select and right-click motion menus.
- keyboard shortcuts.
- lab actions.
- a panes panel for a extra versatile workspace.
Proceed studying for an in-depth look contained in the Workbench revamp obtainable in Cisco Modeling Labs’ newest function launch.
Contained in the CML 2.6 Workbench revamp
Including nodes with—or with out—a mouse
Incorporating new nodes into your workspace remains to be an easy course of, whereby you possibly can drag and drop your chosen kind of node onto the canvas. However previous to CML 2.6, the interactive drag menu was on the right-side menu. Now, it’s activated by deciding on the Add Nodes icon within the Workbench toolbar.
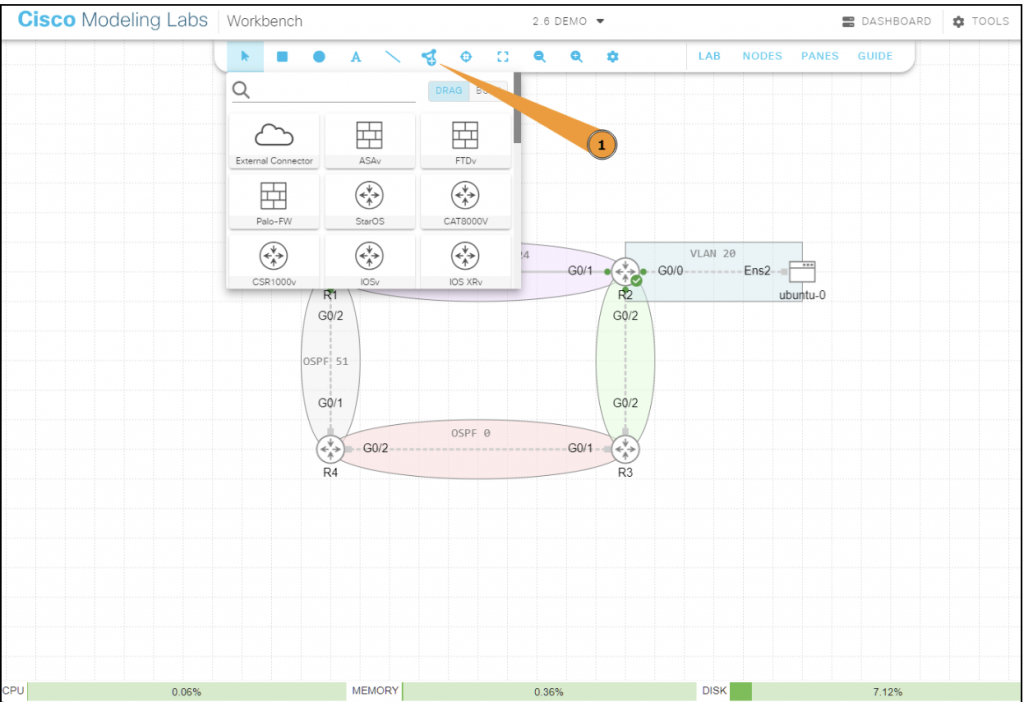
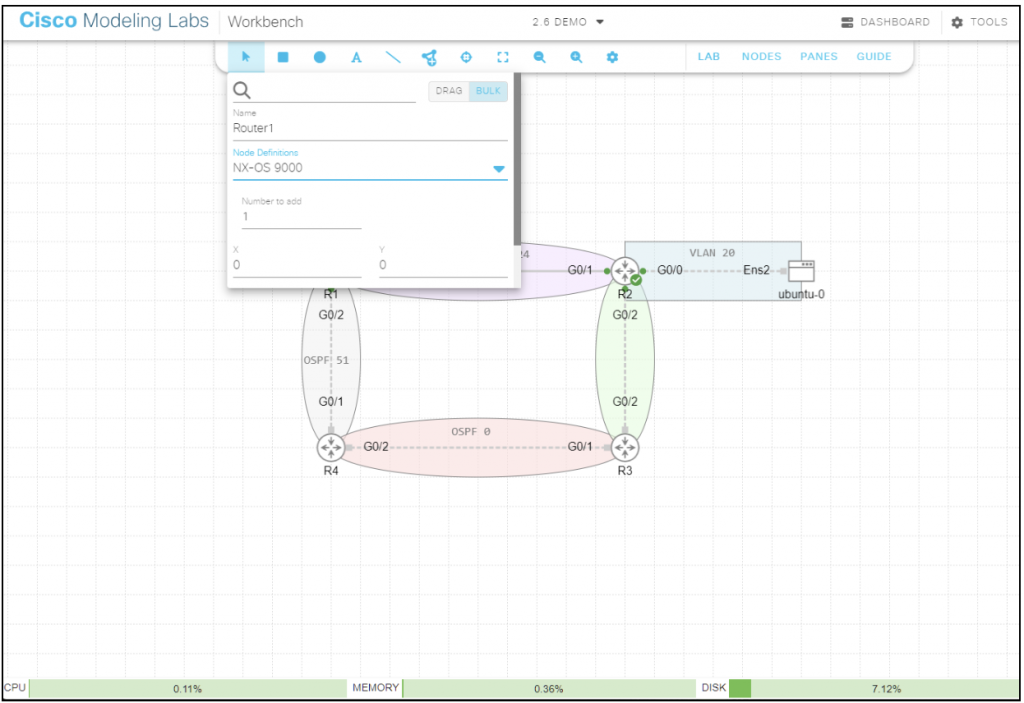
Along with this conventional technique of including nodes, we’ve launched a brand-new function referred to as Bulk Add. It’s designed with accessibility in thoughts, so you possibly can add as many nodes as you want—utilizing solely your keyboard, eliminating the necessity for a mouse.
Enhancing parts within the Sidebar
We now have redesigned the consumer interface to offer a extra streamlined and unified expertise for customers as they edit parts inside a lab. Now, in CML 2.6, the Sidebar serves as the only, consolidated hub for altering all of your lab parts. Whether or not you need to edit a node, hyperlink, or annotation, merely choose it, and the Sidebar will show the related enhancing choices.
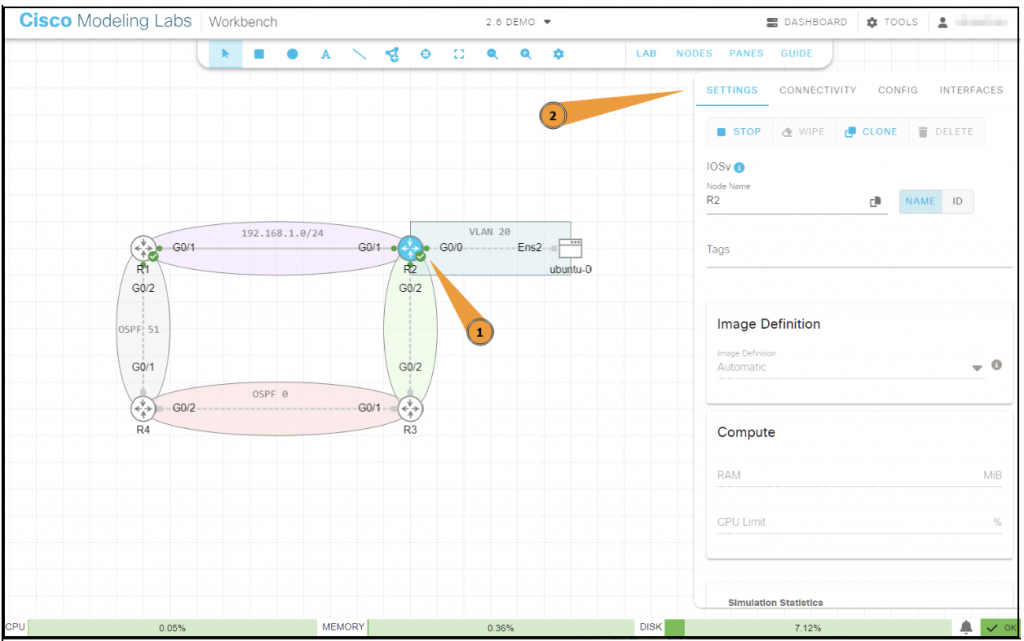
This streamlined strategy to handle your lab parts eliminates the necessity for the underside panel to shift in response to the Workbench state. In flip, you profit from a extra targeted expertise. With this setup, you possibly can maintain your consideration on the underside pane whereas concurrently enhancing the properties of a lab aspect utilizing the Sidebar.
Utilizing the Multi-select Motion menu
You’ll be able to activate the Multi-Choose motion menu by deciding on a number of parts and right-clicking wherever on the canvas. This motion opens a Context-sensitive menu with a definite part for every aspect kind.
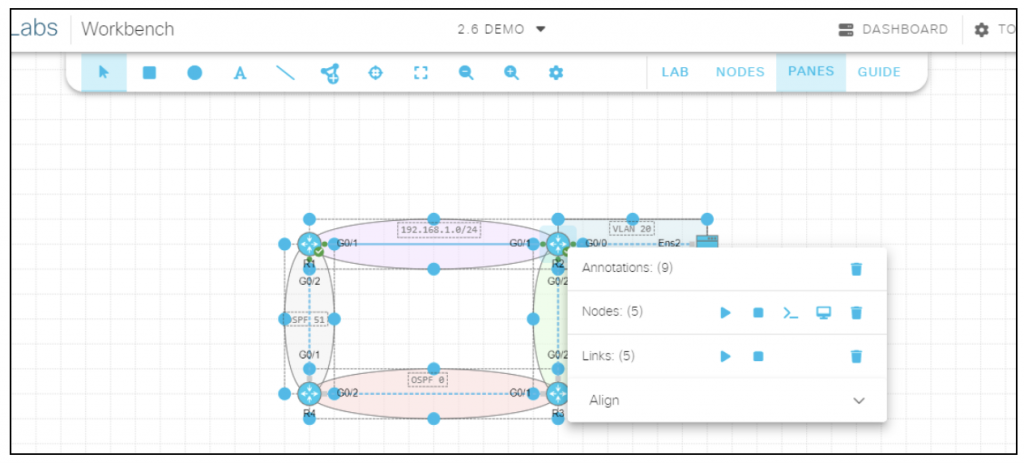
Inside every part, you possibly can carry out actions on the corresponding aspect kind. Please word: the system at present does not confirm the validity of an motion. Additionally, when you choose a number of nodes, an Alignment part turns into obtainable within the menu, offering choices to align the chosen nodes.
Utilizing the Proper-click Context menu
The Proper-Click on Context menu shows if you right-click a sort of aspect: annotation, node, or hyperlink. This menu presents a listing of actions particularly tailor-made to the chosen aspect kind.

Be aware: the Proper-click Context menu sometimes offers extra actions for every aspect kind in comparison with the Multi-select Motion menu.
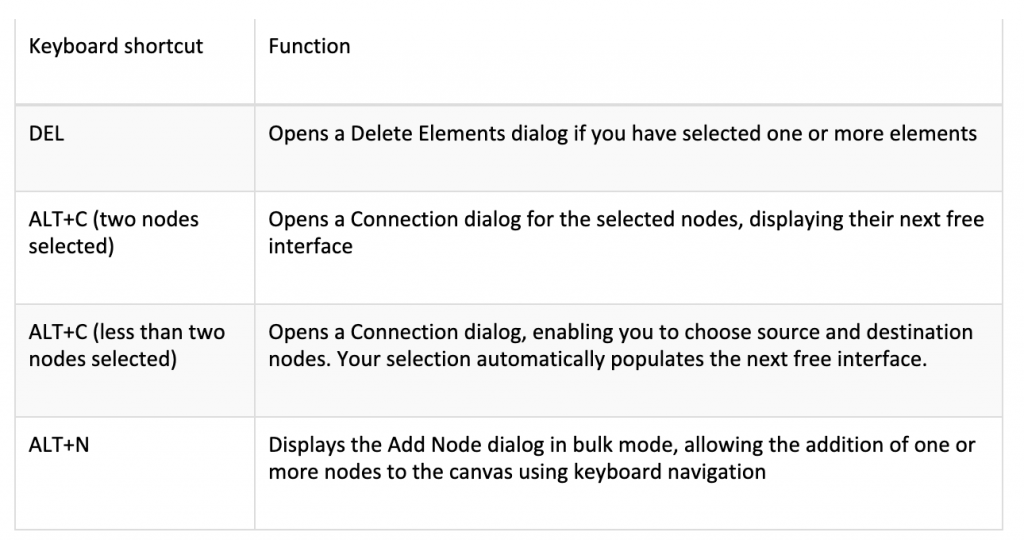
Keyboard shortcuts
Lab Actions menu
You could find the Lab Actions menu within the toolbar below the “LAB” part. You can too activate this menu by right-clicking the canvas whereas no parts are chosen.

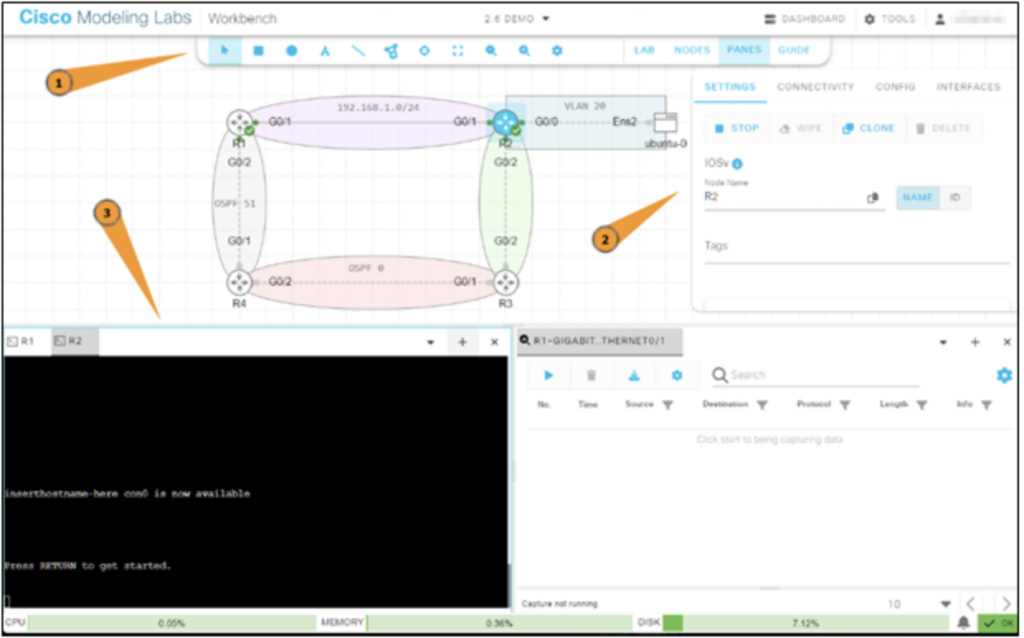
Panes panel
The Panes panel is a flexible device designed to offer you a versatile workspace. For one, the Panes panel permits you to open a number of tabs, every internet hosting a Console, VNC, or PCAP session. You can too select the way you need to host tabs: in just one pane or throughout a number of. As an example, you possibly can have one pane containing an open console session whereas one other runs a packet seize.
What to bear in mind when utilizing the Panes panel:
- One single pane is about by default, however you possibly can add others by deciding on the “+” icon.
- When you’ve got multiple pane, you will note one pane highlighted with a blue sq., which signifies it will likely be the goal for any new classes you open. (You’ll be able to change this by clicking in a unique pane, which units it as the brand new goal.)
To open a tab, merely right-click a operating hyperlink or node, and open the corresponding session for VNC, Console, or PCAP. As an added comfort, you even have the choice to pick a number of nodes and concurrently launch a number of classes, streamlining your workflow.
After you have a tab open, you possibly can simply reposition it by dragging it from one pane to a different. This drag-and-drop performance offers an easy strategy to set up your workspace in keeping with your choice or want.
The panes and their respective tabs are designed to retain their state on a per-browser and per-lab foundation. This implies your association of panes and tabs, in addition to the content material inside them, will stay as you set them (even in the event you navigate away or shut your browser), offering a persistent working surroundings.
Every pane tab is provided with a context menu, which you’ll entry by right-clicking the tab. This context menu incorporates choices and actions that pertain particularly to the kind of tab, supplying you with a set of related controls proper at your fingertips.
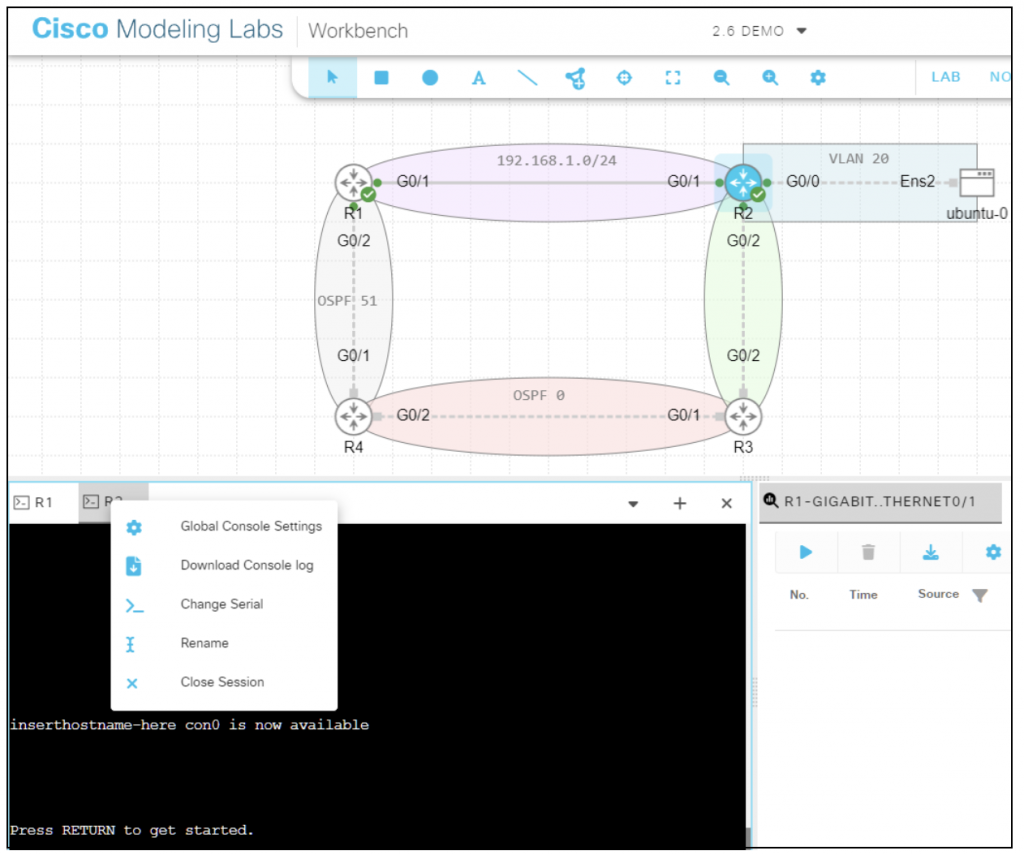
To make your workspace much more customizable, you possibly can rename tabs to replicate their content material or function. You’ll be able to both double-click on the tab, which is able to can help you edit the identify straight, or right-click on the tab and select the Rename possibility from the context menu.
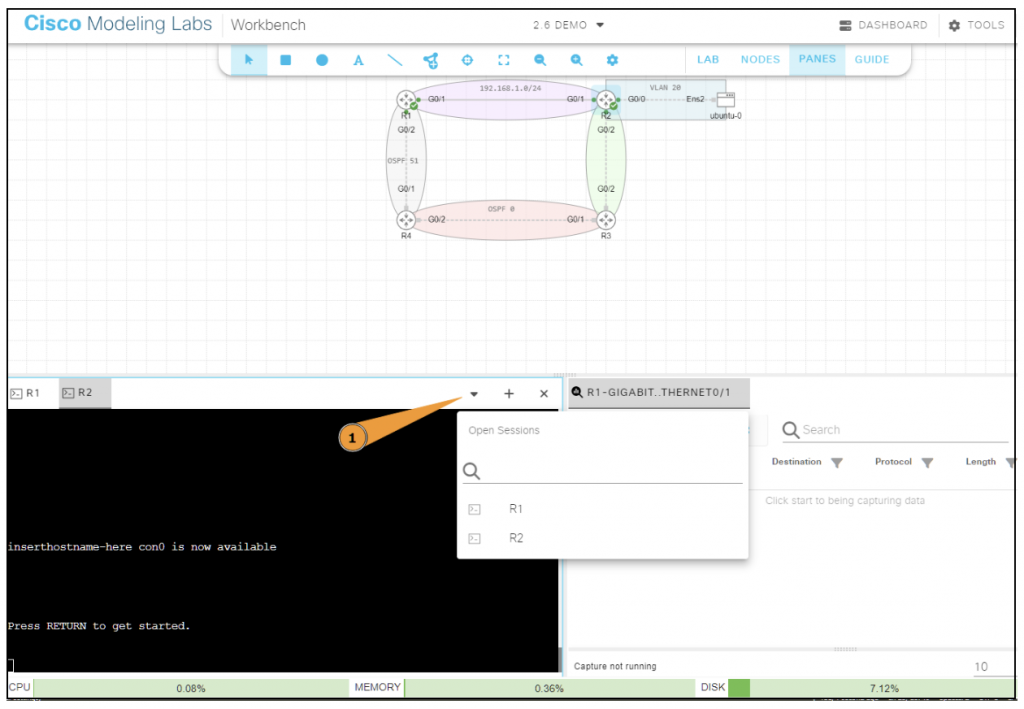
The Carrot Down icon related to every pane (see under) serves as a gateway to a menu. This menu shows a searchable listing of all at present open classes, making it straightforward so that you can navigate on to the session you want.
That will help you monitor the connection between your tabs and their related parts, you possibly can choose a tab to view its corresponding node (or hyperlink) on the canvas. This implies you possibly can immediately see which components of your lab you might be at present interacting with by way of your session.
In the event you want extra canvas area quickly, you possibly can cover and present the Panes panel by clicking the “PANES” toolbar possibility.
Till subsequent time…
I hope this text has sparked your curiosity in CML v2.6, the most recent model of Cisco Modeling Labs. For extra info on what’s new in Cisco Modeling Labs 2.6, view the launch notes. You can too watch this latest demo for a guided walkthrough of the brand new CML 2.6 updates.
I’m keen to listen to about your experiences as you give the brand new Workbench a spin. Please be at liberty to share your suggestions within the feedback part under. Till subsequent time, glad labbing… and luxuriate in exploring all that this replace has to supply!
Join with the CML – Private Neighborhood on the Cisco Studying Community.
Observe Cisco Studying & Certifications
Twitter | Fb | LinkedIn | Instagram | YouTube
Use #CiscoCert to hitch the dialog.
Learn subsequent: “Get Began with Terraform and Cisco Modeling Labs” by Ralph Schmieder. Learn now.
Share: